
If you decided LP coding is for you, this article will explain how to get started. Of course, you can always join Genesis at
telnet genesismud.org:3011 and apply for a wizard position.I believe that learning by doing is the fastest way to learn coding so here are how you start up your own sandbox.
I published a virtual machine on the Amazon EC2 cloud that has anything that you need to get you started. The mud driver and mudlib build are credited to the Genesis Interest Association.
Amazon EC2 is a Amazon service that allows you to run virtual machines ( a kind of computer :)) on demand. You don't need to buy a new computer and install Linux for several hundred dollars and a lot of sweat and time. Here is how to get your own computer or instance on Amazon for about 3 cents per hour.
You can get your mud sandbox up and running in one hour. Here are the steps.
1. Get an Amazon EC2 account.
Go to the Amazon EC2 page and sign up for an account.
- Click the “Sign up for This Web Service” button on the Amazon EC2 detail page. You must have an Amazon Web Services account to access this service; if you do not already have one, you will be prompted to create one when you begin the Amazon EC2 sign-up process.
Go to the Amazon ECS Administration Console login page and enter your credentials.

3. Create a spot request
Click the spot requests menu item. Choose the Community AMI tab. Enter ami-a147a8c8 in the search box to search for the Genesis AMI. Click the Select button.

Enter 0.04 as spot request. This will allow you to obtain an instance faster, in about 30 minutes.
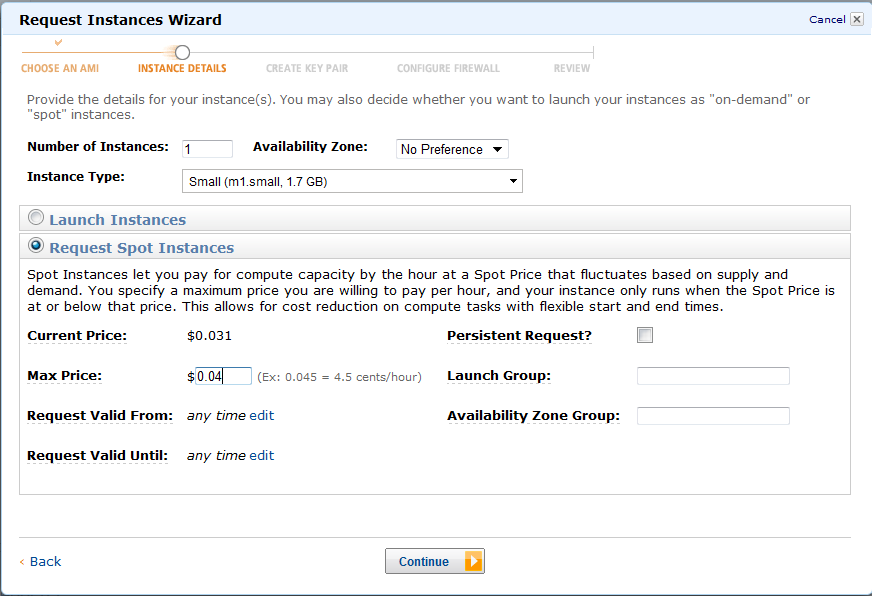
Click continue. On the next screen accept the default values and click continue too.
The next screen asks to create a new key pair. This is an important file that you need to keep securely on your hard disk, as it allows the connection to the server via the root account.

Make sure you click the "Create & Download your Key Pair" and record the location where you saved it.
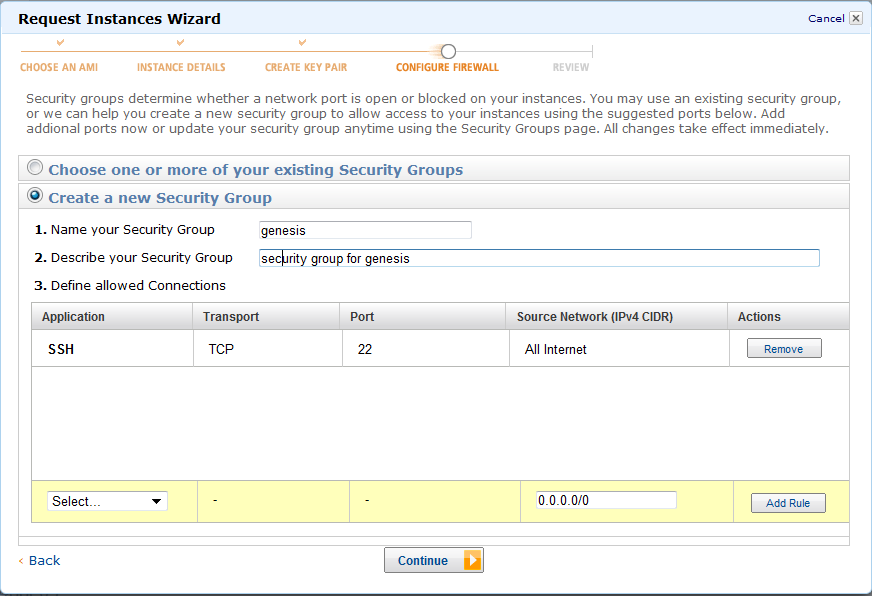
Click Continue to advance to the security group page. As your computer will be accessible from the Internet, it needs to be locked down for security.
From the bottom drop down select SSH and click the Add Rule button. This will allow only SSH connections to your computer for now. Click Continue.
The next and last screen is the summary screen and it should look like this:

Click submit to create your spot request. The request should be fulfilled in about 30 minutes. Go and drink a coffee and keep a tab on your instances. When your instance is started go to the next steps.
4. Download, install and set up PUTTY.
If you are using Linux you already have all you need. If you are on Windows, you can use PUTTY to establish and SSH connection to your server. You opened the SSH port earlier when you created the security group.
Download PUTTY. Download the whole installation kit for Windows as it has several utilities that will be needed. Run the installer.
5. Log in the "mud" account
Your instance comes pre-configured non-privileged account where you can run your mud. The password for this account is tom!bombadil.
As I posted the password for you to log in here on the blog, the first thing you will do is to change it.
In your AWS console click on the instances menu item. Click on your instance and on the bottom page copy the Public DNS value. It should look like this:
ec2-[yourIP].compute-1.amazonaws.comHere is how you log in:
PUTTY (Windows)
putty -ssh -2 mud@ec2-[yourIP] .compute-1.amazonaws.com
6. Change the password for the "mud" user
After login type this command at the prompt:
> passwdFollow the prompts and change the password.
7. Start the mud driver
The mud driver is in the "bin" folder. Type the following commands to start it:
> cd binThe second command starts the driver in such a way that it will not be shut down after you log off.
> nohup driver &
8. Open the port 3011
Your mud runs on the port 3011. Our security group configuration blocks everything except ssh. To open the port 3011 go to the AWS console and click on the Security Groups menu. Choose the security group genesis on the right pane.

Leave the select on "Custom" as we are adding a custom rule. Fill in the rest of the fields as in the image above and click Add Rule. The port is not open and you can connect to the mud.
9. Connect to the mud
Use your favorite mud client to connect to the mud. The host name is the public DNS name that you gathered above and the port is 3011. Create a character and look around.
Enjoy.
No comments:
Post a Comment